How to use a Professional Windshield Repair Kit
How to use a Professional Windshield Repair Kit the Right Way
A bad windshield repair usually starts before the resin ever touches the glass. The surface is contaminated, the injector is misaligned, the technician rushes the vacuum cycle, or the damage should have been rejected in the first place. If you want to know how to use professional windshield repair kit equipment correctly, start there - with inspection, setup, and process discipline, not guesswork.
Professional repair is not the same as squeezing resin into a chip and hoping UV light makes it disappear. Done right, a repair restores 100% of the strength, structural integrity, function, safety, improves clarity, and gives you a result you can stand behind with a straight face in front of a customer, insurer, or fleet manager. Done wrong, it compromises the safety, structural integrity, traps air, leaves silvering, and turns a profitable job into an unsatisfied customer.
## How to use a professional windshield repair kit the right way
The first rule is simple: repairable damage gets repaired, non-repairable damage gets rejected. That sounds obvious, but a lot of poor outcomes happen because techs try to force a repair on glass that should be replaced. You need to inspect the [break type](https://www.ultrabond.com/all-windshield-crack-repair-kits/the-six-types-of-windshield-breaks-and-how-they-impact-the-repair-strategy), location, contamination level, crack length, edge involvement, and whether the inner layer has been compromised.
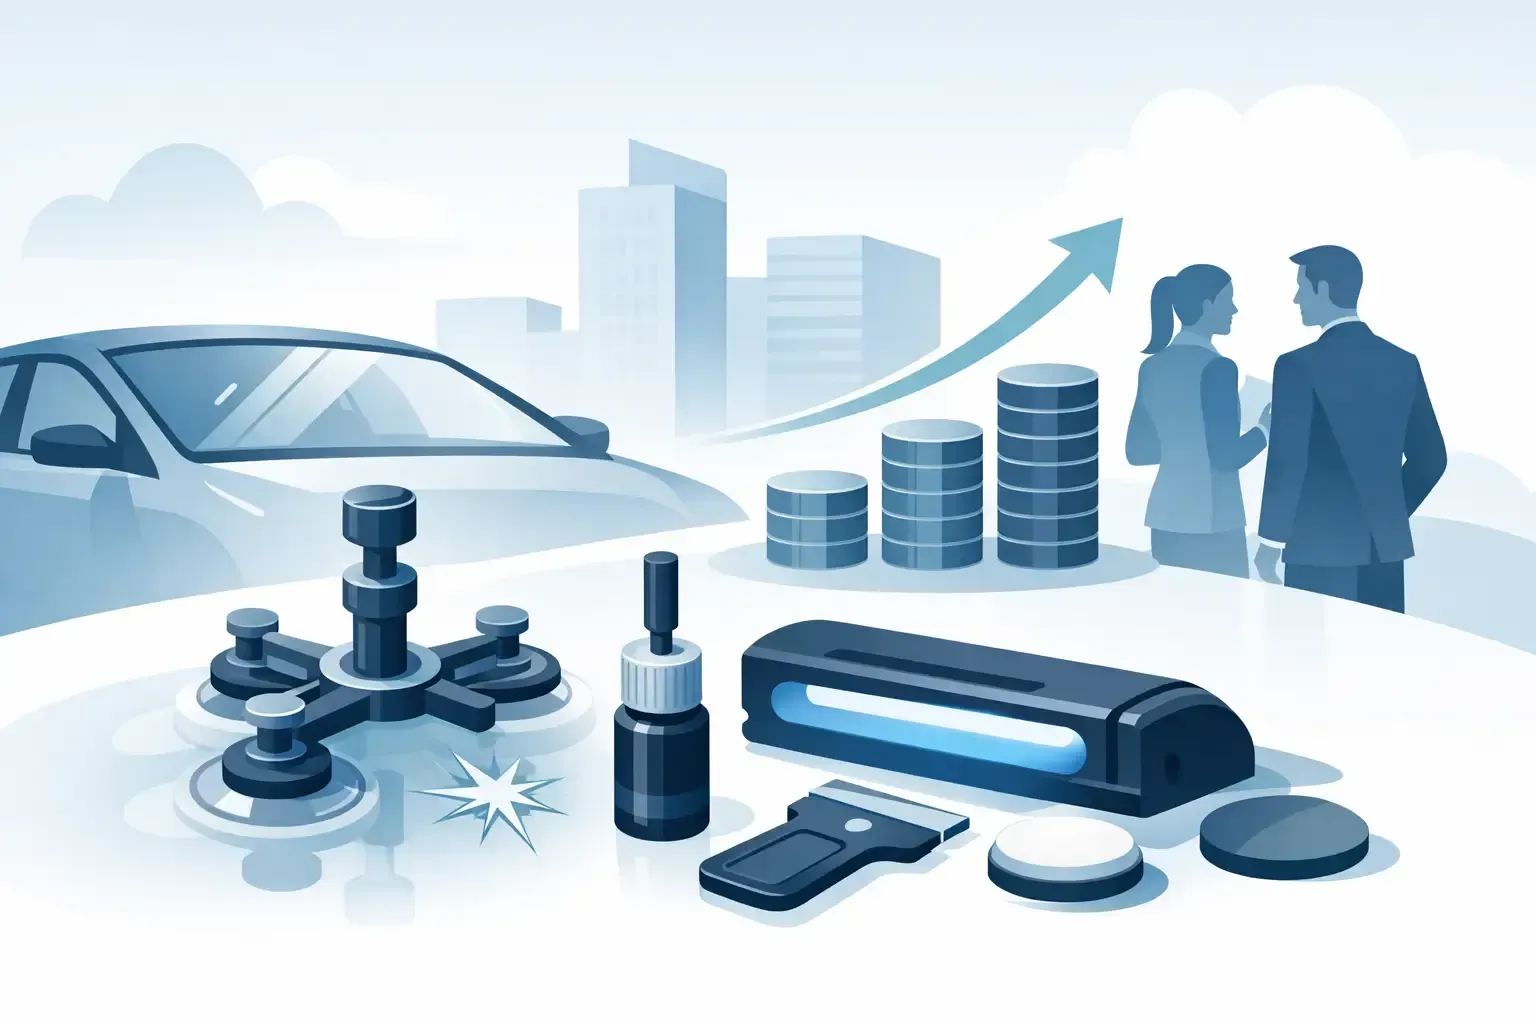
A [professional windshield repair kit](https://www.ultrabond.com/professional-windshield-crack-repair-kits) is built to control pressure or flex on the glass, the pressure on resin, vacuum, resin flow, curing, and finishing. That control is the whole point. DIY-level methods rely on luck. Professional systems rely on process. If your kit includes an injector, bridge, resin chamber, curing strips, pit resin, polish, carbide tools, and a UV light, each piece has a job. Skip one step and the whole repair suffers.
### Start with damage assessment, not the sales pitch
Look at the break under proper lighting. A bullseye, star break, combination break, or short crack may all be repairable, but they do not fill the same way. Tight, fresh breaks usually repair cleaner than old damage loaded with dirt, washer fluid, or moisture. If the crack has reached the edge, spread through multiple branches, or shows severe contamination, your result depends on whether the system and your skill level are built for that job.
This is where real technicians separate themselves from replacement salespeople. You are not just selling a cheaper option. You are making a repair decision based on safety, optics, and durability.
### Clean and prepare the impact point
Do not flood the break with glass cleaner. That mistake pushes contamination deeper into the damaged area. Instead, clean the surrounding glass surface first, then use the correct prep method at the impact point. If there is loose glass, debris, or compacted contamination in the pit, remove it carefully with the proper probe or carbide tool.
Moisture is another silent repair killer. If the break is wet, cold, or has been through a car wash, dry it before injecting resin. Controlled heat can help, but too much heat can expand the glass and complicate the fill. This is one of those it depends moments - enough warmth to drive out moisture is good, overheating the area is not.
## Set the bridge and injector with precision
Most technicians lose repair quality here. The bridge determines the efficacy of a chip repair more so than the injector. It must sit level, have pure compression so it can flex the break open without spreading the damage. The injector has to center directly over the impact point or entry area. If it is off-center resin will leak out.
Tighten the bridge just enough to hold position without stressing the glass. Then bring the injector into contact based on the system instructions. Too loose and you lose sealing.
With long cracks, alignment matters even more. Resin has to be introduced where it can move through the crack path efficiently. Some systems require strategic crack opening, flexing, or staged filling. That is not beginner improvisation. That is controlled technique.
### Use the vacuum and pressure cycle correctly
This is the core of how to use professional windshield repair kit systems like a pro instead of a hobbyist. The vacuum phase removes trapped air from the break. The pressure phase drives resin into the damaged channels. If you rush either one, you leave air in the glass. Air is the enemy. It shows up as silvering, poor clarity, and weak-looking repairs.
Start with vacuum according to your equipment design. Then switch to pressure and monitor how the resin moves. Sometimes the damage fills quickly. Sometimes you need multiple cycles. Stubborn star legs, tight combination breaks, and older chips often need patience.
A good tech learns to read the glass. If the legs are still bright or reflective, they are not fully filled. Press on the glass lightly if your method calls for it. Shift angle and lighting. Confirm the fill before moving on. The resin does not care that you are in a hurry.
### Cure only after the break is fully filled
Once the break is filled, cure the repair resin with the appropriate UV source. Do not cure early because the surface looks decent from one angle. Inspect from inside and outside the vehicle. A repair that looks acceptable in shade can reveal unfixed legs in direct light.
When the main fill is complete, remove the injector assembly carefully. If the pit needs finishing resin, apply pit resin to level the surface and place a curing tab over it before final curing. This step affects both appearance and wiper durability. A repair that is structurally sound but poorly finished still looks amateur.
## Finish the repair so it looks professional
After curing, scrape excess resin flush with a razor at the proper angle. Then polish the area if your system includes polishing compound or pit finish steps. The goal is not to erase all visible evidence. Serious technicians do not promise magic. The goal is to stabilize the damage, restore strength, and maximize clarity.
That matters commercially. Customers accept a visible repair when you explain the standard correctly. They do not accept a sloppy repair that looks unfinished. There is a difference.
### Common mistakes that kill repair quality
The biggest mistake is trying to repair contaminated or non-repairable damage without setting expectations. The second is poor bridge and injector setup. The third is impatience during vacuum and pressure cycles. After that, most failures come from underestimating moisture, using the wrong resin viscosity for the break and temperature, or curing with a source that is not producing uniform UV intensity on the entire break or crack.
Temperature matters more than many new operators realize. [Resin flow](https://www.ultrabond.com/windshield-repair-resin/xphobic-windshield-repair-resin) changes with ambient conditions. Cold resin moves slower. Hot glass changes behavior. You need to adapt, not run the same routine every day of the year.
There is also a business mistake hiding inside the technical one. If you do not follow a repeatable method, you cannot scale quality. That means more callbacks, weaker reviews, and less confidence when selling higher-value crack repair work.
## When chip repair and crack repair are not the same job
A lot of people searching how to use professional windshield repair kit equipment are really asking one of two questions: how do I fix a chip, or how do I profit from bigger damage? Those are related, but they are not identical.
Chip repair is usually faster and more forgiving. Long crack repair requires more judgment, more control, and better system design. Resin movement over distance, crack tip management, and visual outcome all become more demanding. If your goal is to move from basic chip work into higher-ticket repairs, treat that as a technical upgrade and a business upgrade.
That is why professional systems matter. They are not just about doing the job. They are about doing the job consistently enough to charge confidently and defend your process.
### What a professional result actually looks like
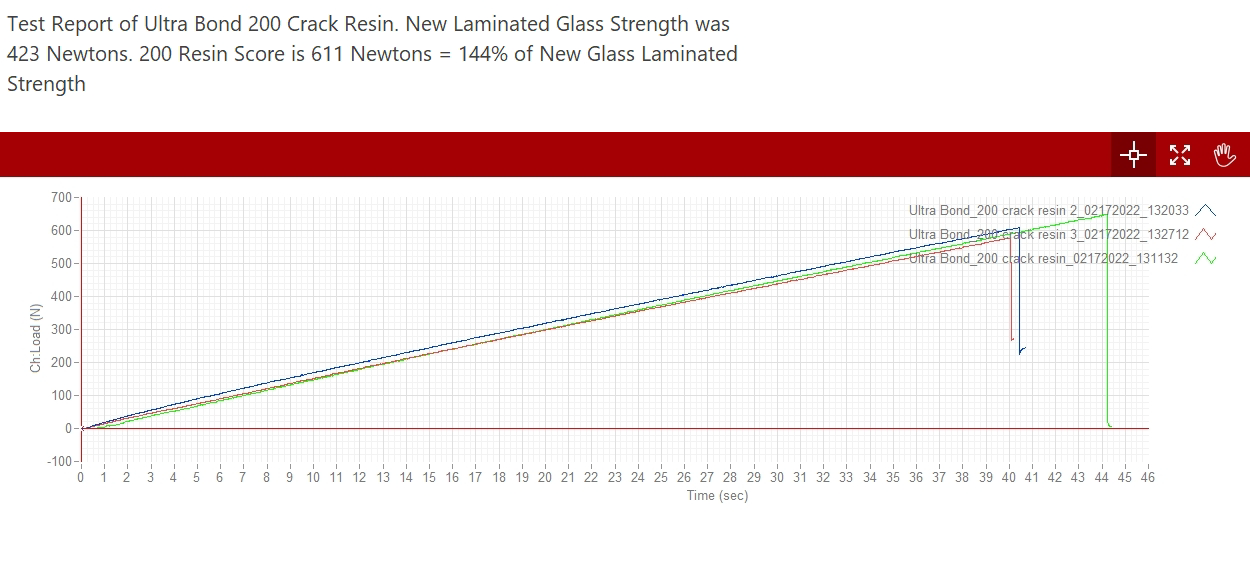
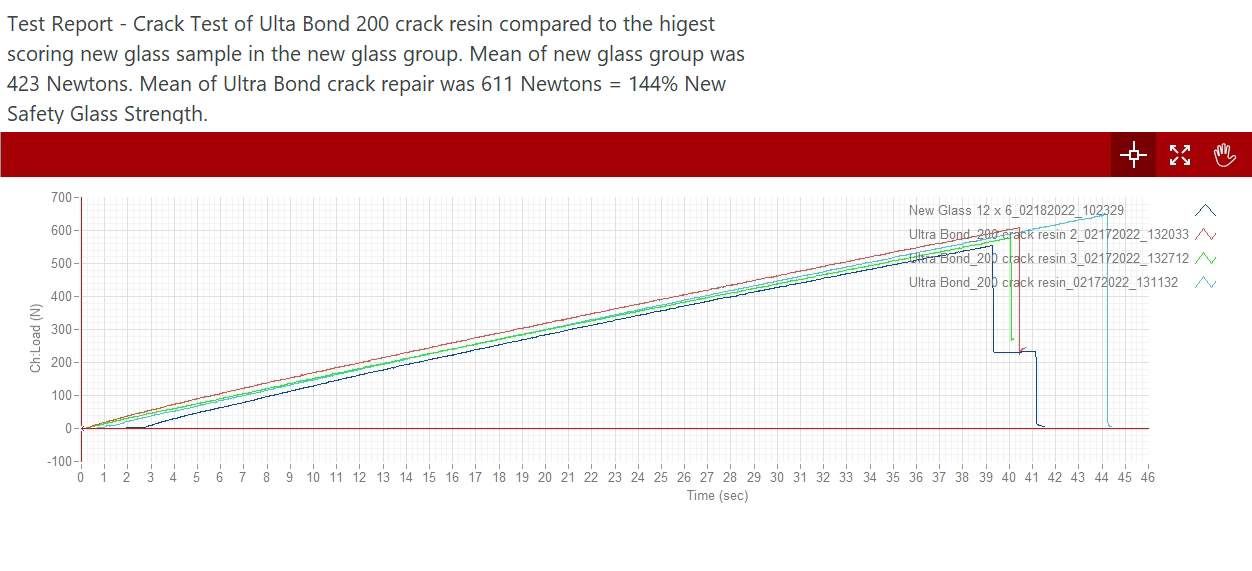
A professional result is a repair that is structurally sound, meets the insurance legal contractual obligation of pre-loss condition, which is obtained by 100% strength restoration, optically improved, and properly documented in your workflow. It may still be slightly visible. That is normal. Anyone promising invisible repairs on every break is selling fantasy.
What you should be aiming for is full resin penetration where repairable, a smooth finished surface, and a clear explanation to the customer about what was restored and what cosmetic trace may remain. That is how professionals build trust and repeat business.
Ultra Bond has built its reputation around that distinction - not hype, but proof, process, and repair performance that can be defended and has been defended in federal courts.
If you want stronger outcomes, stop treating windshield repair like a gadget sale. Treat it like a technical safety service with standards. The money follows the technician who can inspect correctly, reject bad candidates, execute the fill with discipline, and hand the keys back with confidence.